Last year I was commissioned by the Royal Canadian Mint to design two coins for the 2014 O Canada silver coin collector’s series. When I first listened to the voice mail I didn’t believe it was real at first. I was so excited to be contacted by the Royal Canadian Mint to design not only one but two coins!
They told me that they also selected other artists to submit designs. To me it was a huge honour just to be asked for a submission, but to my delight my designs were chosen for both the limited mintage 1/2 oz. Fine Silver Coins O Canada 10 coin set as well as the 1 oz. Fine Silver Coins O Canada 5 coin set. I have been waiting since last May to see my designs as engravings on the coins. They were finally released last night and I was so excited to see my coins!
This $10 silver collector’s coin was engraved from a watercolour painting of a skier floating through champaign powder. The soft snowy slope contrasts with the steep rocky mountains in the backdrop and gives some suspense as to what terrain the skier will find over the ridge.
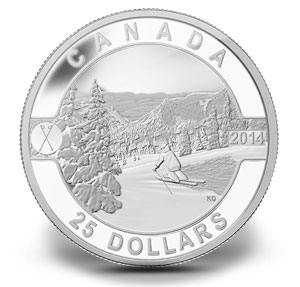
This $25 silver collector’s coin was engraved from a watercolour painting of a skier making first tracks on a gorgeous sunny day in the Canadian Rocky Mountains. It appears as though the skier is floating on air and indeed that is how it feels to ski on fresh powder.
Designing these coins for Canada was a huge honour for me and the highlight of my career as an artist. It’s amazing to see my watercolour painting transformed into engravings. They take on a whole different look and it wasn’t at all just a matter of copying my designs onto the coins. The engravers are true artists, interpreting each line and value and translating them into a 3D replica of the artwork. I am amazed by the fine detail they were able to achieve.
For ten years my brother, Craig Smith, was in the alternative rock band Blinded. With music as his main passion, it wasn’t surprising that on special occasions he would often surprise us with an original song. The first one was at my dad’s retirement and it was a hilarious western/folk song recounting my dad’s life story. In 2004 he wrote an original song for my mom’s leap year birthday gift and it was so good my mom sent it into CBC and they played it on the radio. More recently he wrote two songs as my wedding gift and played them at my wedding. One had us smiling emotionally and tearing up, and the other had the whole room shaking with laughter.
Most of the gifts Craig made were composed of a single song, but one year he surprised us with an entire album. In 2004, Craig and his Blinded band mates created a Christmas gift for their families made up of original songs, characters and narrative that took the listener on a magical journey to the North pole led by a very quirky elf called Norgy.
“Every year at Christmas time the story would be listened to by friends and family who would encourage them to produce it for others to enjoy as well. So during the 2010 Christmas holidays Blinded pulled up their Christmas socks, put on their festive sweaters and got back in the studio where they revamped the narrative, wrote more original Christmas songs and collaborated with many different artists and voices to create the new and improved An Elf’s Tale!”
I’m proud to say that I created the artwork for the album cover. [Edit: this was the original album cover when the story was called Santa’s Note. Since this post the name of the album has been changed to An Elf’s Tale and it has a new cover too.] At my Christmas craft fairs last year I was selling copies of the double CD. One CD has all of the original songs with the story narration, the other CD has just the songs. My husband and I had our CDs on repeat in our vehicles for a few months!
I suggest, without bias of course, that you purchase my brother’s amazing Christmas music for the upcoming holiday season! You can either purchase the full album which can be mailed to you, or you can buy a downloadable version. All of the options are available at www.anelfstale.com. Clips of the songs can be heard on the website. Your entire family will enjoy this album. It’s the best Christmas gift we ever got. :)
On July 4th I was a guest artist at the Peachland Public Library.
The Librarian read two art related stories to the children and then I did a short art demo. Well, it was as short as I could make it, but not short enough for these eager young artists. They were starting to squirm with anticipation of painting their own master pieces. Finally we set out paints and brushed for everyone and they had a blast.
It was very exciting to be called by the Kelowna Art Gallery today to be told that Barry McDivitt from CHBC News wanted to interview me. This is so funny since I just wrote my first ever press release last night but I hadn’t even sent it out yet. It feels like it’s right out of the movie The Secret.
After playing phone tag I finally got to talk to Barry and he asked me if they could do an interview this afternoon. I said I would meet him in an hour at my art studio. I was on my way home from getting groceries so when I got home I had 15 minutes to put all the groceries away, change my clothes, do my hair, put on some makeup, grab my 4×6 paintings and head out the door to my art studio. I made it at 3pm on the dot.
Barry and Jim from CHBC were in and out in less than 15 minutes. They did everything in one take. Then they headed back to their studio to edit the clip in time for the 5:00 news. True professionals. It was very exciting. I hope that little clip will help inspire others to participate in this community art project!
I’m not crazy about how they preface the story by saying that it doesn’t matter how ‘bad’ of an artist you are, you can now have your art displayed at the Kelowna Art Gallery. But if that’s what it took to encourage so many people to participate then I guess it’s okay. I just think that every one of those paintings which were submitted were very special in their own way.
Come to the Peachland Public Library to participate in an exciting World Record attempt!
The Kelowna Art Gallery is attempting to create a new world record for the most 4″x6″ original landscapes in one place.
On Saturday, January 21st from 10am-11am, I will be at the Okanagan Regional District Peachland Branch Library to facilitate an art session.
Bring your own art supplies if you have them, however there will be paper and art supplies free of charge for you to use. All you have to do is come! It’s a free event where you can get inspired to paint or draw your 4×6 entries.
If you‘d like to create some entries at home ahead of time, bring them in and I will deliver them to the Kelowna Art Gallery for you!
You don’t have to be an artist to participate! The only “rule” is that the artworks have to be 4”x6” Okanagan inspired landscapes on paper. Your entry can be created with pencil, charcoal, crayon, felt, pencil crayon, paint, or collage!
For the month of January my artwork is featured at Picture Perfect at 339 Bernard Avenue in Kelowna, BC. I’m excited because I have a whole WINDOW to myself! On display are some originals, prints and art cards. There are more in the back too so if you go by be sure to ask to see the rest of my work. Thanks for stopping by!
I was recently commissioned to paint a picture of Mount Hosmer and naturally the Fernie Ghostrider. Here is my original painting the lady saw which she liked:
Often times when I get a commission I tend to freeze up. It’s a lot of pressure to paint a commission and it can give you “painter’s block” if you don’t mitigate those feelings. Why is it so much more difficult to paint a picture for someone else than for yourself? For one thing it is hard enough to “get it right” when you’re painting from your own vision, but it’s very difficult to paint what’s in someone else’s head.
How do you know if this is what they had in mind?
What if they don’t like it?
Can I use my painter’s intuition or do they want it to be “just so”?
What is “just so”?
Questions like these and more can float around your head and block the creative flow.
Well, last weekend I heard a suggestion that may change the way you think about commissions forever. I was taking Alex Fong’s watercolour workshop, The Magic of Watercolour, and he was talking about commissions. He said that his trick to take the pressure off is to paint three different versions of the commission and then give the client a choice.
“Paint three?” you may be asking, “isn’t a commission hard enough work in the first place, let alone tackling it three times?” Yes, a commission is hard work, but part of the hard work is the struggle with the mental block of painting a commission. Imagine how much easier the paint would flow if you could lift that block and paint without any of the associated pressures of painting a commission. It would be freeing.
Painting three paintings can take longer than painting one, but I have always found that in painting multiple pictures I tend to improve as I go. You will start to see shapes better. You will loosen up and carry your brush with a lighter touch using bold confident strokes. Here is a chance to learn and grow as an artist.
Your client will be impressed that you have provided them with three choices. Plus, as Alex says, it alleviates that awkward pause while you’re wondering “do they like it? Gosh, what if they don’t like it?” when the client first sees your finished piece. This way they have a choice, they can pick their favourite. It actually takes the pressure off the client as well who may be asking themselves “Will I like it?”, “What if I don’t like it?”, “What will I say?”.
I have tried this approach a few times before and it has worked great. My clients have been thrilled and once I even sold two pieces instead of one!
Here is my latest commission which I actually painted four times. Which one do you think she will choose?
As soon as I saw this Cake Pops recipe I wanted to make cake pops and Halloween seemed like the perfect occasion. As it turns out cake pops are very time consuming and a lot harder to make than I thought they would be. You can read all about my first failed attempts in my previous post “How NOT to Make Cake Pops”. I’m happy to say that I finally figured out the trick to cake pop success and I will share my tips with you below.
To see how I prepared the cake balls themselves, pop over to “Halloween Cake Pops Part 1” which has baking photos and tips.
Decorating Cake Pops Step 1: Melt the Chocolate
To melt the chocolate I put white and dark melting chocolate in Pyrex containers and set them in an inch of water in an electric frying pan set to just below simmer. If the chocolate is too hot it will start to harden and take on a fudgey texture. It’s important not to drip any water in the chocolate as it will ruin it’s ability to melt nicely. I have different spoons for each chocolate pot so that I can occasionally stir or aid in the dipping:
Decorating Cake Pops Step 2: Secure the Sticks
Before you start dipping your cake balls in the melted chocolate there are two essential steps (in order to avoid cake pop flops). I’m very grateful to a friend of mine for letting me in on this little secret as it made all the difference in the success of my cake pops:
First, place your chilled cake balls in the freezer for approximately 20 minutes, just enough so that they will hold their shape when you insert the lollipop sticks.
Second, dip the end of the lollipop stick in melted chocolate and immediately insert it into a cake ball. It helps if the chocolate forms a ring around the lollipop stick at the base of the cake pop. This will help secure the stick in the cake pop so that the cake ball won’t fall off when you dip it in the chocolate.
Once you have inserted all of the lollipop sticks using this method then pop them all back in the freezer to really secure those sticks and make sure the cake isn’t going to crumble or fall off when you go to dip it:
Decorating Cake Pops Step 3: Drip Before you Dip
Dip the cake pop into the melted chocolate so that it is fully covered, then pull it out and let the excess chocolate drip back into the melting pot. You can even gently tap the lollipop stick on the side of the pot. This will ensure that the weight of the sprinkles won’t cause your chocolate to drip down the stick taking the sprinkles with it!
Decorating Cake Pops Step 4: Add Sprinkles
Add the sprinkles before your chocolate hardens either by sprinkling them over the cake pop or by rolling the cake pop in a bowl of sprinkles:
Decorating Cake Pops Step 5: Stick and Set
To let the cake pops set stick them in a block of styrofoam (or I’ve also seen them stuck into an upside down egg carton) and pop them in the freezer so the chocolate will really harden and set in place. If your party is a few days away you can leave them in the freezer but I don’t recommend leaving them longer than that as the cold air will dry out the chocolate and it could even give it a white tint. But a few minutes to a few days is no problem:
I’m so excited for my guests to see and sample my Halloween Cake Pops this weekend. That is if my husband and I don’t eat them all first!
Okay, so in my last post on Halloween Cake Pops I was so excited at how my cake pops were turning out. I proudly displayed all the wonderful photos of preparing the cake and icing and mixing it to form the cake balls (see Part 1 Halloween Cake Pops here). I couldn’t wait to keep working on them but little did I know what was in store for me.
In the cake pop tutorial I used each cake pop looks perfect and so easy to make:
I love this recipe. (click the picture above to see the full article)
So how could I go wrong, right? Well, as it turned out, there are plenty of ways to go wrong when making cake pops and I am here to help you avoid the mistakes I made in my cake pop baking adventure.
Cake Pop Mistake #1: Drip Stick Disaster
If you don’t carefully drip off the chocolate before you roll the cake ball in sprinkles, the whole mess will start dripping down the lolipop stick. Ack!
Cake Pop Mistake #2: Cake Sticks to Fork Mess-Up
If you have ever made chocolates you may have used this trick of letting the chocolate drip through a fork. I thought I was a genius for coming up with this nifty way to avoid the dripping disaster (see cake pop mistake #1 above). My plan was to let all the excess chocolate drip off, then I would transfer the cake ball to a bowl of sprinkles, and then insert the lollipop stick.
Unfortunately, cake is sticky and soft and it likes to attach itself to the fork and so in trying to detach the cake ball some of the cake would stay on the fork and cause a big mess. Ack!
Cake Pop Mistake #3: Fat Sticks Cause Cake Ball Explosions
I found out the hard way that letting some chocolate harden on the end of the lollipop sticks is not a good way to make cake pops. Apparently you are supposed to dip a stick in the melted chocolate and immediately put it into the centre of a cake pop so that the chocolate will harden and help keep the cake pop together. Who knew that letting the chocolate harden on the sticks would make them fat and cause the cake pops to slowly explode from the added volume. And here I was trying to be efficient:
Exhibit A: Cake Pop Flop
This is what happened to one of my cake pops. The hardened chocolate on the lollipop stick created a massive hole in my cake pop and as it was setting the whole cake pop dropped down the stick onto my styrofoam base. Ack!
Exhibit B: Cake Pop Explosion
This cake pop didn’t even make it to the styrofoam base. When I inserted the lollipop stick it exploded and even though I tried to repair it with extra melted chocolate and attempted to cover my tracks with extra sprinkles, it looks like my cake pop’s guts are spilling out. Appropriate for Halloween I suppose, but not exactly the party favour I was going for. Ack!
Cake Pop Mistake #4: Clumpy Chocolate Mass
In my extra cleverness I added orange food colouring to melted white chocolate to match my Halloween theme. It took quite a lot of food colouring to get the colour I wanted. Big mistake! If you’ve ever made chocolates before you might know that you’re not supposed to add water to melted chocolate… well apparently mass amounts of food colouring will have the same effect: the chocolate will harden, clump, and take on the texture of old crumbly fudge.
Absolutely no amount of heating, stirring or added butter will make this chocolate dip-able. Ack!
Give up?
Cake Pop Alternative #1: Almond Bark with Sprinkles
If you decide to give up your cake pops, a fun way to use up the melted chocolate is to pour it over some toasted almonds to make almond bark. Add extra flare by using up some of your unused cake pop sprinkles:
Cake Pop Alternative #2: Dipped Confections
An easy way to get over your cake pop failure is to make these yummy treats which look great and are sure to please your party guests without any flops, explosions or clumps. I stuck toothpicks in pieces of Australian Gold Ginger and dried papaya. I dipped the candied ginger in the left over dark chocolate, and I dipped the papaya in the melted white chocolate. I left some of the papaya showing as it is orange and very Halloween-y. I also used up some of the sprinkles to entice visually and it also gives a yummy crunch to the candy treats. Yum!
Success!
However pleased I was with myself over these cake pop alternatives, I was still determined to make yummy and cute cake pops. Come back tomorrow to see how I conquered these obstacles, learned from my mistakes and made my cake pop adventure a success!
A few weeks ago I saw an article in Vashti Magazine about how to make Cake Pops and I immediately felt the urge to make them myself. They look so YUM! and they are sure to be a party pleaser on Halloween.
First thing’s first, I went grocery shopping to pick out a cake mix and some melting chocolate. I couldn’t believe that Save On Foods didn’t have any orange or black sprinkles. Shocking!
I used a Swiss Chocolate cake mix:
The cake pop recipe I’m using says to mix the cake in a food processor but since I don’t have one I simply tore it into pieces and crumbled it between my fingers:
The next step is to mix the icing into the cake mix. However, one of my twitter friends the Klumsy Artist, told me to watch out because cake pops made with store bought icing are almost too sweet to eat.
To cut the sweetness of the Betty Crocker prepared icing I mixed it 2 to 1 with margarine, added a teaspoon of vanilla, and a couple tablespoons of milk.
(To be honest, I actually mixed it closer to 1 to 1 and the icing started to taste too much like margarine so I added 1/2 cup of icing sugar to make it taste like icing again.)
The result was a nice butter-cream texture and flavour, much lighter than the packaged icing. Look at the difference in colour between my modified icing in the bowl and the store brand in the jar:
I then mixed a cup of my light creamy icing into the cake crumbs:
Using my hands I patted the mixture into a ball of cake fondant which has the consistency of very soft and fluffy cookie dough. You can still break it apart like cake, but you can form it like dough. It’s in-between:
I wanted to make sure my cake pops are all the same size so my husband had the idea of using a levelled off ice-cream scoop to measure out the filling. What a great idea! He modestly gave credit to the fact that he used to work at Tim Hortons. Genius I say.
These scoops would make gigantic cake pops so I took a knife and cut each one in half:
I counted up the scoops and realized I was only going to get 30 cake pops out of all this work. This recipe should make 40-50 so I promptly re-cut each ice-cream scoop of cake-pop-mixture into thirds rather than halves. This worked out to 44 cake pops instead of 30, woo hoo!
Here is the difference in size. See the half scoop sized ball on the left and the 1/3 sized ball on the right. Not a big loss in size for a big gain in quantity:
I was having a lot of fun and could have kept going but by this point the cake balls were getting soft and squishy and also a bit oily. Time to put them in the fridge for the night to let them set:
Oh boy, now it’s time to do the dishes:
Join me tomorrow when I finish creating my Halloween Cake Pops. :)
Last weekend I painted this Winter Stream watercolour painting. Here are the steps I took to create it…
1. Underpainting
First I wet the entire paper and did a wet-in-wet wash (the brush is full of wet paint which flows into the wet surface of the pre-wetted paper) using cobalt blue, raw sienna and permanent rose.
I was careful not to cover the entire surface of the paper with colour so that the wash would incorporate some white sweeps (simply the wet paper). I was also careful not to use too many brush strokes which would have blended the colours together not only dulling them but creating a flat wash. I wanted the paper to sing with light and colour.
2. Misty Background Trees
Next I waited for the paper to completely dry and then I painted in a soft layer of misty tree shapes in the background on the right, seemingly the ones which are going to be behind the stream as it curves off to the left of the viewer. What I’m actually painting isn’t the trees themselves, I’m painting what will become the shadowed snow on the tree branches, so I’m careful to paint softly and leave some light areas.
In the spot where the sun is going to be catching the branches I use raw sienna rather than the cobalt blue / permanent rose mixture and I leave some white areas. Notice how I didn’t paint the trees right to the bottom branches; I used rounded shapes to give the impression that the trees are sitting behind snowbanks.
3. Add Contrast
To add drama I now begin to paint the darker shades on the trees using loose flowing brush strokes with purposeful yet random ‘holes’ to represent the snow on the trees.
I have prepped several colours and I alternate which puddles I dip into as I paint so that the trees will have some life to them and not be one flat shape. Some of the colours I have prepared are cobalt blue, permanent rose, dioxazine purple, hunter’s green and indigo. The colours sit next to each other on my palette and they tend to run into each other too so it creates some nice shades and nuances.
Another artist asked me how I paint such exact shapes. Actually I am not painting each individual shape. I am using a photograph for reference but in the process of trying to capture the essence of the snow on the trees I am also moving my brush in a rather helter skelter way so that my painting will still look like a painting.
4. Paint Around Important Mid-Ground Shapes
I’ve decided that I’d like to paint a tall leafless tree on the right side of the painting for balance. I want it to look like it has snow on it so it’s important that I establish the shapes before I paint in the dark shadows on the background trees.
Since this scene is backlit I paint in the snow which will go on my new tree using combinations of cobalt blue and permanent rose. When it’s dry I add the branches under the snow and I continue painting the dark sweeps onto the background trees, careful to paint around the branches on my mid-ground tree.
5. Tackle the Water
The water is a lot easier than it looks but it may take a bit of practice. I very lightly drew in my stream with pencil so that I would have an idea of where the water was to go. I don’t always draw first but with this process I am going to need to be quick so there will be no time to hesitate part way through.
Once I start painting the water I must stay within the area of my stream. I did not wet the paper first. I used a lot of paint and made sure that it stayed nice and wet as I worked from the top of the stream to the bottom. Since the stream is broken up by a bar of snow I treated the top and bottom as two different sections. I didn’t want the top part to dry while I was working on the bottom part or vice versa.
In order for the reflections to work out I needed the paint to still be wet. So as soon as the top shape was completely filled in I immediately dripped in some verticle swipes of very dark indigo. Then I mixed some white acrylic paint with a tiny bit of water and dropped in a few delicate vertical stripes. Perhaps the most important part of this is that once I laid in these colours I did not touch it any further. I let the paint do it’s thing.
The bottom section of the stream I painted a little differently than the top, only because it was bigger and I was afraid it might dry before I could get to the vertical stripes which create the illusion of reflections. Switching from one colour to the next I filled the stream shape with overlapping vertical stripes which were wet enough to blend seamlessly together yet not too wet that they lose the vertical feeling.
I worked quickly and then again while the stream was still quite damp I brushed in some vertical stripes of watered down acrylic paint. Not too watered down mind you because then it would have backwashed into the paint and caused some blossoms.
To remind the paint that I wanted it to stay in this vertical pattern I tilted my paper up so that the paint would run vertically and not pool sideways.
Finally I added some deep indigo just under each snowbank while the paint was still slightly damp. This let it bleed just a bit and it visually lifts the snow off the water just a teeny bit.
6. Complete the Water Illusion by Creating a Surface
The water now has beautiful reflections but this will sometimes unwittingly draw the viewer’s eye right off the bottom of the page. Where does the water stop?
Let’s create the illusion of the stream’s surface which will immediately give the water incredible depth and at the same time keep the viewer’s eye well within your painting.
For this step to work your water has to be dry or very near dry. Using a slightly damp or nearly dry clean brush, ‘draw’ a few horizontal lines across the surface of your water. Gently dab the line with a paper towel if it didn’t lift on it’s own. By lift I mean that the pigment lifted off the paper leaving a pale white line.
Be careful not to over-do this step. It is so much fun and so effective that you might get carried away and if you have too many lines it can be distracting and actually take away from the overall illusion. Just a few will do.
7. Liven up the Darks
Once I finished the darks on the trees I realised that they were quite overwhelming and a bit dead, void of light. To liven them up I dropped some Holbein Grey Blue into the bits which were still damp. Holbein Grey Blue is a chalky blue opaque watercolour so it can stand up against the rich darks. This was not a planned step in my painting but I love what it did for it.
8. Add Form to the Snow
In the above picture the water is believable but the snow appears to be flat as if covering a concrete surface. In nature snow is undulating and poofy; it has form. The magic happens when you add shadows to the snow. Using a lost and found line paint the top surface of a snow pile and then with clean water bleed out the top edge so that the shadow has gradation. A shadowed edge along the side of the stream virtually lifts the snow above the water and creates snow banks.
9. Calm the Distractions
A successful painting will have an area of focus and draw your eye around the painting. You can sometimes pick out problem areas or distractions by squinting at your painting.
Squint at the above picture and what sticks out to you the most? For me it is the bright snow on the branches of the trees on the left. This creates two problems: one, those trees should actually be in shadow, they are too bright which betrays the direction of light, and two, they are distracting the viewer’s attention away from the main focus which is the light shining down on the stream.
Using a soft wash of cobalt blue and permanent rose I can gently eliminate this distraction and direct the eye to the area of most light (which in hindsight I wish I had put more to the right and not so close to the centre of the painting, but that’s another topic).
10. Be Brave Enough to “Wreck it”
When this painting was at the above stage I was unsure if I should call it done. I really felt like it would be fun to add some lightly falling snow, but at the same time I was afraid to ‘wreck it’. When you’ve come this far it is a little scary to start dripping paint over your painting.
Luckily for me I was taking a watercolour workshop and I asked my classmates if I should add snow or not. The response was 50-50, half said snow, half said no. So to break the tie I deferred to the expert, our workshop instructor Alex Fong. His response delighted me. He said “Of course! Everything needs a little snow. Just Go For It!” I’m sure glad I did since the snow really lightened up the dark areas without distracting from the focus and gave life and movement to the painting.
If you feel that your painting needs a little extra something, have fun and just go for it! When you are brave enough to “wreck it” you can sometimes luck out and get beautiful results.
I had a lot of fun painting this winter water scene. I hope you enjoyed seeing the steps I took to create it. Please reply below if you have any comments or questions. Thank you!
One summer in my twenties I was the coordinator for all the Children’s summer programs at the Williams Lake Public Library and this summer I am stepping back into that realm by planning an activity for the Peachland Library’s summer reading program.
A few years ago I illustrated a children’s book by Rebecca Tyson titled “You Will Know Water”. We published it privately in 2 small editions. This summer Rebecca is going to join me in Peachland to read her book to the children and then I am going to do a fun painting activity with them.
It’s a free workshop but you have to sign up. If you have young children in the Okanagan, you can sign up by calling the Peachland Library at 250-767-9111. There are weekly reading programs at the library, but our activity is planned for Wednesday, July 13th, 2011 from 10am – 11am.
Here’s a peak at some of the artwork from the book:
Artists for Japan has a new home! It is transitioning from a facebook group to a facebook fan page. This is great news. It means that the page will be public, anyone with a facebook account can ‘like’ and follow the page, and it is more manageable for the admins.
The first auction was only 10 days long and it raised almost $4000! The second auction has just started and it goes until May 2nd.
Hopefully we can raise just as much or even more money towards this very worthy cause. One thing is for sure, all of the money will be well received and put to good use as it will take years to rebuild the affected areas.
We are looking for artists, bidders and onlookers who want to be inspired.
I think it was Carrie who said we are putting the ‘art in heART’.
When I moved into my art studio in August 2007 it was like a dream come true, and about 10 years earlier than expected. It was one of those things where I couldn’t really afford it, but I couldn’t afford not to either. The amazing part was that I did not seek this studio out, the opportunity presented itself to me almost like a gift from the Universe.
When I first moved into my studio I sent out an email inviting people to a watercolour workshop.
I received an email back from Carrie Harper, an artist who I had never met but who was on my mailing list from a mutual contact a few years back. Her email was short and sweet: “Any advice on Studio hunting in Kelowna… I have been looking for a while and finding spaces very expensive. Thanks.” I wrote back to her saying that I didn’t really know of any studios for rent.
Then only a couple of weeks later my studio partner told me that she was going to have to move out. I called Carrie up and asked her if she was still looking for a studio space. She came to see the studio and she couldn’t have been more excited or a more perfect partner for me. We get along so great, it’s like we are soul sisters.
Every November Carrie and I put together a Christmas Studio Show so that our friends and family can see what we have been creating throughout the year. It has been a joy to have our neighbour Nikki Balfour open her doors and join in on the events. We love the atmosphere of having both studios open where the guests can flow through from one room to the other.
We are thrilled to announce that our show has expanded. This year Nikki, Carrie and I have organized a studio show with SEVEN artists displaying and selling their work ranging from mixed media and photography to jewelry, ceramics and felted Christmas tree decorations! Carrie and I are currently sharing our studio space with another talented artist, Tina Schnellert, and it’s been so exciting seeing all of her new encaustics going up on the walls. You have got to come and see these pieces in person to appreciate their rich texture.
We invite you to our 4th annual Christmas Art Show! Studios 4 & 5, 375 Bernard Avenue, Kelowna, BC Friday, November 26th 5-9pm
Saturday, November 27th, from 11am to 4pm
(Sunday by appointment)
Get to know the 7 artists displaying and selling their work:
Someone will win this 8×8 acrylic painting of mine for only $50! I donated it to a fundraiser for the Whistler Arts Workshops on the Lake program. It’s an amazing program where the Whistler Arts Council offers art workshops in a beautiful cabin on Alta Lake in Whistler, BC. I was lucky enough to take a workshop there this July and the whole time I was in artist heaven!
Here is more information from the Whistler Arts Council:
The Whistler Arts Council (WAC) would like to invite you to a celebration and fundraiser in support of Whistler Art Workshops on the Lake program. The event will take place at the beautiful Nita Lake Lodge on Sunday, September 12, from 4pm to 7pm.
The event will focus on a raffle of original artwork created by emerging and professional artists including some of the Art Workshops instructors. Raffle tickets for the 8” x 8” pieces of artwork are $50 each. As people’s names are drawn, they choose a piece of artwork; it’s a matter of first come first serve. It is a fun way to purchase amazing and affordable original art! There will be a cash bar, complimentary appetizers and the opportunity to mingle with fellow artists and art lovers.
WAC also invites you to consider contributing to the event by painting a canvas (or two!) for the raffle. Canvases will be supplied by WAC.
The Whistler Art Workshops on the Lake program is entering its 5th season and offers two to four day workshops of introductory to advanced level instruction in visual art led by world-renowned professional artists from across Canada . The workshops are held in the serene and rustic Alta Lake Station House set on the shores of Alta Lake .
David McEown demonstrates watercolour painting at the Alta Lake Cabin during a Whistler on the Lake workshop.
Unfortunately, this popular program is threatened after the recent budget cuts to the provincial BC Arts Council and Gaming Grants. These cuts have greatly impacted arts and culture organizations throughout the province that provide economic, social, and institutional value to our community.
Volunteers, in partnership with the Whistler Arts Council, have come together to create a fun fundraising event that will not only provide a source of much-needed funding, but also offer a forum to showcase local talent.
Please attend this celebration and – if you are an artist – consider contributing a work of art in support of this terrific program that has seen so many emerging artists grow into the creators of sought-after masterpieces.
Deadline for artwork submission is Friday, September 3rd.
Contact the Whistler Arts Council or the volunteers below to purchase your ticket to the celebration or to pick up your canvas for creation.
Thank you and we hope to see you on September 12th!
This excerpt was written by Jenn McElroy, the Event Coordinator at the Whistler Arts Council. For more information about the event you can contact Lisa Geddes or Bea Gonzalez:
Lisa Geddes – (604) 932 6054 or email: lisaandbill at gmail dot com
Bea Gonzalez – (604) 932-8390 or email: beagon at telus dot net
If you find yourself in Whistler, BC, you can visit the Whistler Arts Council at at Millennium Place, 4335 Blackcomb Way, across from the Brewhouse.
Kendra Smith and Keya White painting canvases for the fundraiser
When I lived in Fernie, BC, my friends and I used to have painting parties together. Basically that just meant that we would get together and paint for fun. Last Friday when I was in Whistler, my friend Keya was visiting me from Fernie and we kept up our tradition by having a little painting party in the park. Here we are painting canvases by Alta Lake in Whistler, BC:
It is so fun to paint with a friend. I love it.
Here are the little paintings we did:
On September 10th these paintings will be raffled off at a fundraiser for the Whistler Arts Council in support of the Whistler on the Lake Art Workshops program. You can see more of Keya White’s paintings at photoscapes.ca.
On May 1st Blogger took away support for self-hosted blogs and I didn’t care for their other options. I decided that a WordPress blog would suit me better but then I was so busy that I didn’t have time to port it over. I’m so happy to announce that I have finally moved my blog over to WordPress. Since I hadn’t been able to update my blog for the last few months I had TEN new blog entries waiting to be posted. I am so happy to be blogging again!
Last night at midnight I got home from a week of painting in Whistler, BC. I was buzzing the whole drive home. My 3 day workshop with David McEown was amazing. I LOVED it! The advanced workshop lived up to it’s name as we tackled a very complex studio piece of the Larch Trees and waterfalls near Lake O’Hara. It was great to learn how to approach the layers of the painting and keep the whites in the water.
On Friday my artist friend Keya White and I biked around Alta Lake and painted 8×8 canvases to donate to a fundraiser for the Whistler Arts Council. On September 10th they are going draw the raffle winners and someone will get to take home my painting and support the Whistler on the Lake Art Workshops at the same time.
On Saturday I took the gondola up to the top of Whistler Mountain. I spent the full day hiking and painting. The views were stunning. Here are the four en plein air paintings I did over the course of the day:
Today is the deadline for Lake Country ArtWalk and I was literally mailing off my application at the last minute. Why is it that I tend to procrastinate until the last minute of a deadline? I had a couple of months to prepare for this entry and I guess I thought I had lots of time… until time ran out that is. Thank goodness for deadlines or I wonder if I would ever get anything done!
To find out more about ArtWalk, visit their website at artwalk.ca.
My studio partner Carrie and I sometimes call each other our angels. We are so lucky we found each other. We connect at the heart and love just sharing our energy.
Both of us have been so busy lately that we haven’t been spending much time at the studio. Today Carrie invited me over to her house for some good old fashioned painting. It’s always fun to paint with someone else. Sometimes it’s more social then productive, but I love it. I call days like this ‘a painting party’.
Carrie with her angel paintings (You can see more of Carrie’s work at thepearworkshop.com)


 and Keya White (right)")


